3連続出しゃばってすみません。
山本です。
プレゼン配信サービス「ZENPRE」では、スライドの切り替えを手軽に行えるように、スマートフォン向けアプリも配布しております。
iPhone用とAndroid用をリリースしておりますが、私はAndroidアプリを担当しました。
アプリを開発するにあたって、スライドの切り替えをどのような操作で行うかいろいろ考えました。
スタンダード、というか、スマホの醍醐味的な操作で言えば、指でスライドさせるフリック操作ですね。
ただ、その仕様だと1ページずつしかめくれないのと、次のスライドはどんなものだったっけ、というときに確認できません。
そこで、AndroidにあるGalleryクラスに注目しました。
これは、画像を横一列に羅列することができます。
フリック操作で左右に移動でき、クリックイベントも取得できるということで、
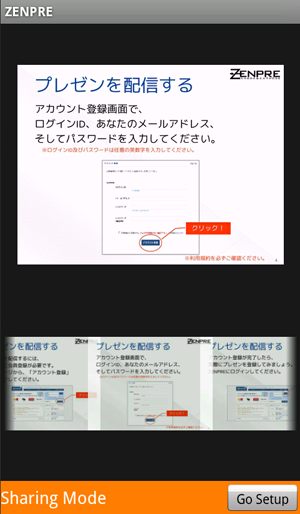
フリック操作でスライドの移動を行い、クリックすることでページを確定するという仕様にすることにしました。
その際に書いたソースコードを一部公開します。
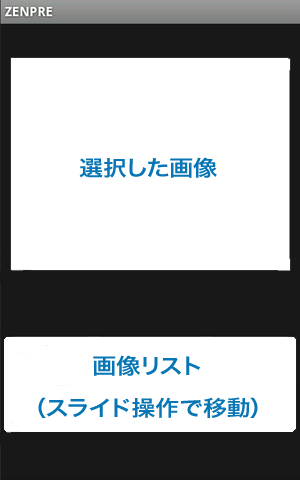
まずは、galleryを定義したビューxml
<LinearLayout android:layout_width="fill_parent" android:layout_height="wrap_content" android:layout_weight="4"> <ImageView android:id="@+id/selectedImageView" android:layout_width="fill_parent" android:layout_height="fill_parent" android:adjustViewBounds="true" android:scaleType="centerInside" > </ImageView> </LinearLayout> <LinearLayout android:layout_width="fill_parent" android:layout_height="wrap_content" android:layout_weight="1" android:padding="5px"> <Gallery android:id="@+id/imageGallery" android:layout_width="fill_parent" android:layout_height="wrap_content"> </Gallery> </LinearLayout> |
画面上部に選択したスライド画像。
下部に登録しているスライド画像のgalleryを配置します。
処理を行うActivityクラスには以下のように書きました。
public void onCreate(Bundle savedInstanceState) { // galleryから選択した画像を表示するImageView ImageView selectedImageView = (ImageView) findViewById(R.id.selectedImageView); // gallery定義 Gallery gallery = (Gallery) findViewById(R.id.imageGallery); PresenImageAdapter presenImageAdapter = new PresenImageAdapter(this); // galleryに表示したい分だけ、bitmap形式のオブジェクトを追加する // presenImageAdapter.addBitmap(bitmap); // presenImageAdapter.addBitmap(bitmap); // adapterのセット gallery.setAdapter(presenImageAdapter); // 画像クリックでサムネイル表示 gallery.setOnItemClickListener(new AdapterView.OnItemClickListener(){ public void onItemClick(AdapterView<?> adapterView, View parent, int position, long id) { // 選択された画像をイメージビューに表示 Bitmap selectedBitmap = HttpClient.getImage("クリックされた部分にヒットする画像のURL"); selectedImageView.setImageBitmap(selectedBitmap); } }); } |
galleryと接続するアダプタークラスは、Android DevelopersサイトにあるBaseAdapterを拡張したものを使用しました。
public class PresenImageAdapter extends BaseAdapter { // bitmapのリスト private List<Bitmap> imageItems; public PresenImageAdapter(Context context) { ...... imageItems = new ArrayList<Bitmap>(); } // bitmapのリストに画像を追加 public void addBitmap(Bitmap image) { imageItems.add(image); } // 画像の取得 public Object getItem(int position) { return imageItems.get(position); } .... .... public View getView(int position, View view, ViewGroup parent) { // 表示する画像 Bitmap bitmap = (Bitmap) getItem(position); imageView.setImageBitmap(bitmap); ....... return imageView; } } |
これにより、画面下部には画像のgallery、そのgalleryにある画像をクリックすることで、上部にその画像が表示されます。
さらに、クリックイベントの中に、ページ情報を送信する処理を書いてますので、プレゼンを見ている人に情報がブロードキャストされるようにしてます。
これで基本形の完成です。
あと、余談なのですが、AndroidManifest.xmlを以下のように書いたらどうなると思いますか。
<?xml version="1.0" encoding="utf-8"?> <manifest xmlns:android="http://schemas.android.com/apk/res/android" package="jp.zenpre" android:versionCode="1" android:versionName="1.0"> <uses-sdk android:minSdkVersion="4" /> <application android:icon="@drawable/icon" android:label="@string/app_name" android:debuggable="false"> <activity android:name=".SplashActivity" android:screenOrientation="portrait" android:label="@string/app_name"> <intent-filter> <action android:name="android.intent.action.MAIN" /> <category android:name="android.intent.category.LAUNCHER" /> </intent-filter> </activity> <activity android:name=".HomeZenpreActivity" android:label="@string/app_name"> <intent-filter> <action android:name="android.intent.action.MAIN" /> <category android:name="android.intent.category.LAUNCHER" /> </intent-filter> </activity> </application> </manifest> |
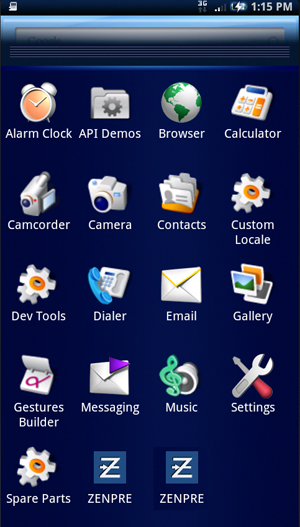
この、
のように、同じアプリが2つ表示できてしまいます。
片方は”SplashActivity”で定義した画面が立ち上がり、もう片方は”HomeZenpreActivity”で定義した画面が立ち上がります。
とくにエラーは起きません。しかも、この状態で、マーケットに登録までできます。
ただし、マーケットからダウンロードして、マーケットアプリ上で開こうとすると、
マーケット(com.android.vending)が予期せず停止しました。やり直してください。
The application Market (process com.android.vending)has stopped unexpectedly.Please try again.
と表示されて開けません。
たぶん、どっちのアプリを開けばいいのか分からないのでしょう。
ホーム画面からアプリを直接指定すると開けますが。
何を隠そう、これをアップしてしまい、ちょっと混乱してしまった経緯があります。
たぶん、誰もやらないと思いますが、ご注意を。。。
というわけで、携帯端末でプレゼンの操作ができる、このAndroidアプリをぜひご利用してください。
AndroidMarketで「ZENPRE」と検索すればヒットします。
そして、いろいろとご意見頂ければ幸いです。


